There’s a particular logic to desserts that don’t require heat. In summer, the oven is the enemy, and the icebox cake - a layered, chilled construction that dates to the 1920s - is its oldest adversary.
What an Icebox Cake Actually Is
The icebox cake belongs to an era when home refrigeration was new enough to feel like a novelty worth exploiting. The concept was straightforward: layer cookies or crackers with cream, slide the whole thing into the fridge, and wait. No baking. No temperature monitoring. The cold did the work. That original logic hasn’t changed, and neither has the basic technique.
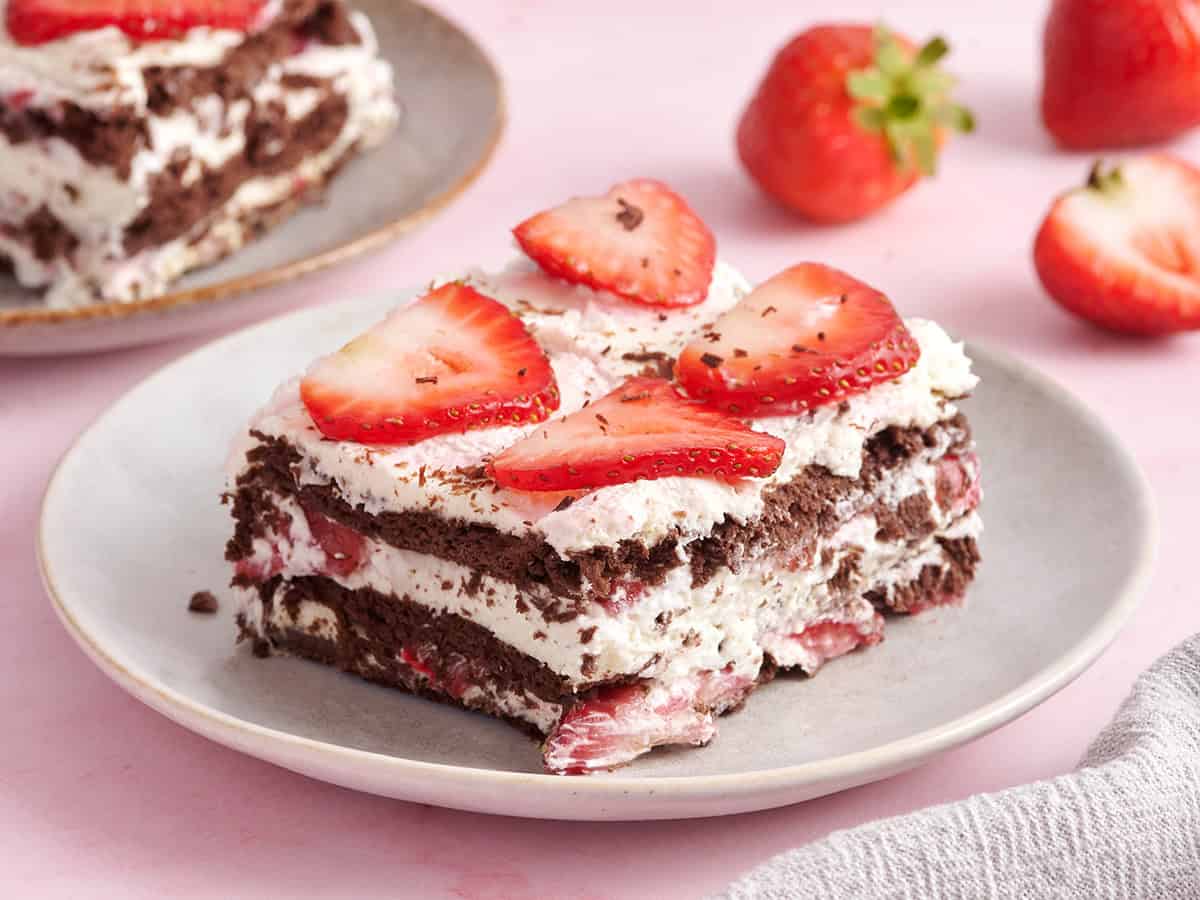
This version uses chocolate graham crackers, fresh strawberries, cream cheese whipped cream, and grated chocolate, all assembled in a standard 9×13-inch pan. The ingredient count sits at seven. Total prep time runs about 20 minutes, after which the fridge takes over for a minimum of four hours. The result is a sliceable, cake-textured dessert with layers that hold their shape rather than collapsing into something closer to trifle.
The transformation that happens during chilling is where the recipe earns its reputation. Chocolate graham crackers, dry and brittle before assembly, absorb moisture from the surrounding cream and soften into something that genuinely resembles a thin cake layer. It’s not a metaphor. The texture actually shifts.
Cream cheese is the structural reason the whole thing works. It adds enough fat and density to stabilize the whipped cream so the cake slices cleanly. Without it, the filling would deflate under the weight of the crackers and turn loose after a few hours. The tang it introduces also keeps the filling from reading as one-dimensional sweetness against the chocolate and fruit.
The Tips That Separate Clean Slices from a Creamy Mess
Temperature matters before you even start
Cream cheese needs to be fully softened before it goes into the bowl. Cold cream cheese doesn’t beat smooth - it leaves small, dense lumps that no amount of additional mixing will fully resolve. Pull it out of the fridge at least 30 minutes before you start, ideally an hour.
The heavy cream, by contrast, should stay cold until the moment it’s needed. Cold fat whips; warm fat doesn’t. These two ingredients need to be at opposite temperatures, which means a little planning before you begin.
How to build the filling without lumps
Beat the cream cheese completely on its own first. Don’t add anything else until it’s smooth and there’s no visible resistance when the beater moves through it. Then stream the cold heavy whipping cream in slowly while the mixer is running. This gradual incorporation keeps the texture consistent and prevents the cream cheese from seizing up against the cold liquid.
Rush this step, and the filling will have a slightly grainy texture that sets into the final cake.
The layer that most people skip
Spread a thin layer of cream across the bottom of the 9×13 pan before placing the first graham crackers. This small step does two things: it anchors the crackers so they don’t shift while you’re building subsequent layers, and it ensures the bottom crackers soften from both sides rather than just the top. A cracker that only absorbs moisture from above will still have a dry, slightly chalky underside when the cake is sliced.
It takes about 30 seconds. It changes the bottom layer entirely.
Chill time is not optional
Four hours is the minimum. The crackers need that long to draw moisture from the cream and complete their transformation. Pull the cake before that point and the layers will still be distinct and crunchy, which isn’t what this dessert is supposed to be.
Overnight is better. A cake assembled the evening before a cookout or potluck will have had eight or more hours to set, and the slices will hold their shape more precisely. This also removes any day-of pressure - the dessert is done before the cooking begins.
At $14.14 for the full recipe, the cost per serving lands at $1.18 across 12 portions. Each serving runs 395 calories.
Adapting the recipe when strawberries are expensive
Strawberry prices swing considerably by season and region. When they’re running high, the berries can simply be left out - the cake still works as a chocolate-and-cream construction that has more in common with a cookies-and-cream format than a fruit dessert.
Other substitutions hold up well: blueberries and raspberries require no preparation beyond washing. Canned peaches work if they’re drained thoroughly first - excess liquid from the can will thin the cream layers and extend the chilling time needed for the cake to set. The core ratio of crackers to cream doesn’t change regardless of what fruit, if any, goes in.
Assembling It Efficiently
The actual assembly follows a repeating sequence: cream layer, crackers, fruit, cream, crackers, fruit, and so on until the pan is full. The grated chocolate goes on top at the end. This is a 20-minute process, not a technical one.
A 9×13-inch pan is the right vessel. Smaller pans will produce thicker layers that take longer to chill through; larger ones will give you a shallower cake with less structural integrity when sliced. The standard pan size is part of what makes the four-hour chill time reliable.
Cover the assembled cake with plastic wrap before refrigerating. Direct refrigerator air will dry out the surface layer and affect the top cream’s texture after a few hours.
The cake can be made up to 24 hours in advance. Beyond that, the strawberries begin to release juice into the surrounding cream, which softens the filling more than intended and can make the layers harder to distinguish when sliced.
One pan yields 12 servings at $1.18 each.